
The sketch, from my personal sketch collection, that will be used as the starting point for all five layouts this week.
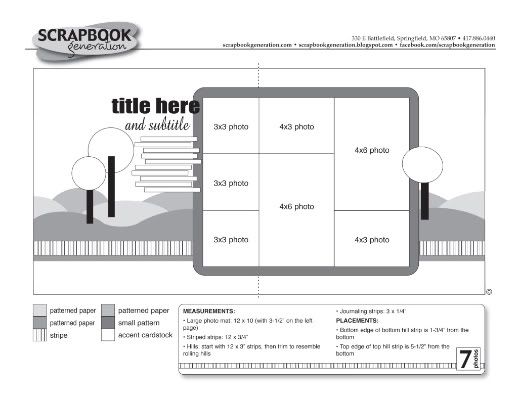
• This sketch is now available to download. All you have to do is click on the "Printable Sketches" link on the right side of my blog, it will take you to the downloads page where you can download and print the sketch.
This is sketch is such a fun one to play around with! It's got a great area for the photos so they take center stage and then a playful arrangement of papers. There are so many different ways to play around with those hills that, even though you might not realize it just looking at the sketch, I'm sure you could fit this sketch to almost any theme.
Layout #1 - Front Yard Exploring
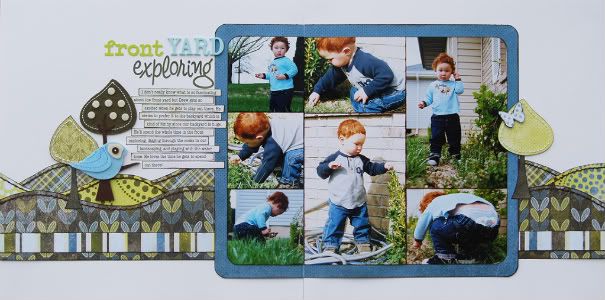
Supply list - Cardstock: Bazzill; Patterned paper: BasicGrey (Marjolaine); Felt tree and bird: BasicGrey; Alphabet: Prima (front), American Crafts (yard), and BasicGrey (exploring)
The first thing I want to talk about on the layout and the sketch are the hills. Don't let the hills scare you away from this sketch. They really are easy to make! There are several ways you can accomplish the look...
To make mine I used the BoBunny ruler that bends and bent the ruler to the shape I wanted my hills to have. It's super easy to use and makes creating wavy lines a breeze. If you don't have that ruler you could just hand draw them. Here a few of my sketching and drawing tips:
• I try to keep my hand and arm loose.
• When drawing the line I do it quickly. It seems like when I go too slow it doesn't come out the way I want it to. It's almost like I over think it.
• After I have the line drawn I go back and fix any areas I don't like.
If you don't trust your drawing skills then try using removable adhesive and ribbon. Add the adhesive to the ribbon and adhere it to the patterned paper in a wavy line. Once you have the ribbon down just trace along the edge of it with a pencil. Then remove the ribbon, rub off the removable adhesive, and cut along the line.
Another thing I want to mention, when you are piecing your layout together the hills can look funny at first. Especially if this is something you don't do often. Trust me though, once you get the whole layout together it will look great! Don't worry if yours doesn't end up looking exactly as they do on the sketch. You could use this sketch over and over and the chances of the hills looking the same on each layout would be pretty slim.
• Variation 1
I added hand stitching along the top, wavy edge of the hills to help define the edges and add some dimension. It helped to make the different layers of hills more realistic and actually look like the hill in the back is far away from the one in the front. If you aren't a fan of stitching you could always use ribbon or Memory Thread for the same look.
• Variation 2
This isn't much of a variation but still something to point out. The trees on the sketch are circles and I went with a different shape. I loved the shape of the BasicGrey felt tree and decided to create my own to match it. To do that I traced around the top of the BasicGrey tree and then cut it out. I also added hand stitching to the edge to match the BasicGrey tree.
• Variation 3
Sometimes I like creating a scene on my layout. Since I already had the hills and trees I thought it would be fun to add a few extras to complete the outdoor theme. On the left page I added a BasicGrey felt bird and then on the right page a butterfly. Don't be afraid to add extras to the sketch. It's a fantastic way to give it a unique look and it can add a finishing touch that completes the layout.
I'm very excited to announce the sponsor for September Sketch Week - BasicGrey! Look at this awesome giveaway from BasicGrey for Sketch Week!
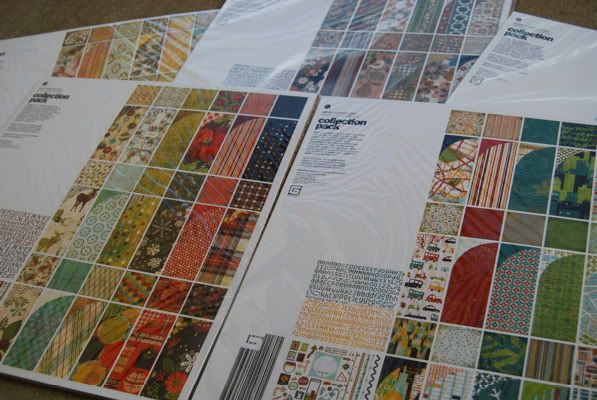
The giveaway includes collection packs of their five new lines: Marjolaine, Wander, Jovial, Pyrus, and Curio. Each collection pack comes with 18 double sided papers, one sheet of coordinating alphabet stickers, and one sheet of coordinating cardstock stickers. And as always the winner of the giveaway will also receive a copy of Sketches for Scrapbooking, volume choice is all yours.
Here's the rundown of how the giveaway works: I'll be posting everyday, Monday - Friday. All week you'll have a chance to leave a comment and next Monday I'll post the winners. You can leave more than one comment through the week to be eligible but not on the same day. (five days = five chances to win!)
Happy Monday!
204 comments:
«Oldest ‹Older 201 – 204 of 204Love this sketch! And love the prizes!
Oh I love the curves on this one and the collage. This will be working outside of my comfort zone that is for sure but I can't wait to try it.
This would be perfect for some pics of my son playing in the leaves. Thanks for the great idea, Christy
what a versatile sketch, one your best yet! love it! truly..
Post a Comment