
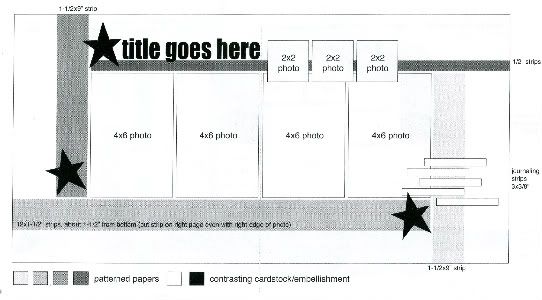
The sketch, from Sketches for Scrapbooking, Volume Four, that I have used as a starting point for each of my layouts.
Layout #3 - "Twisty Straw"
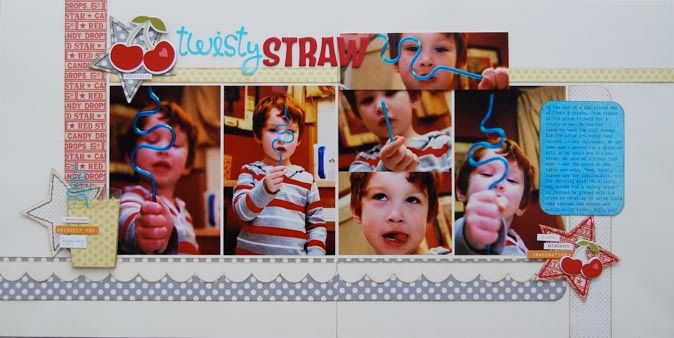
Supply list - Cardstock: Bazzill Basics Paper; Patterned paper: My Mind's Eye (yellow), Jenni Bowlin (red), October Afternoon (gray), BasicGrey (blue) and Sassafras Lass (cream dots); Alphabet stickers: Doodlebug Designs; Chipboard alphabet: American Crafts; Border strip: Bazzill Basics Paper; Word stickers: Creative Imaginations; Chipboard accents (cherries): Creating Keepsakes KOTM; Memory Thread: DMC
• Variation #1 - The three 2 x 2 photos across the top can be kind of a pain if you print 4 x 6 photos only or don't have access to smaller sized prints. Here's an option for those of you that might fall in that category. I used a 4 x 6 photo cropped down to 2 x 6 in place of the three 2 x 2 photos. This would work great for a photo of some scenery, like a pretty view or something that stretches across the whole photo, like the straw in mine.
Another thing I forgot to mention in my post yesterday about those three photos across the top, I would recommend using a foam adhesive to adhere them. Most likely the photos on your layout are all going to have a similar colors and scenes and the having those three photos raised up a little helps them to stand out and not get lost in the larger photos. You could also try edging them with ink or paint for the same reason.
• Variation #2 - I think it is possible, most of the time, to take a sketch and fit any amount of photos you need to on it. One thing I like to do to add a few more photos into a sketch is take one (or a few) of larger photos, with this sketch a 4 x 6, and instead use two smaller photos in it's place. I have two 3 x 4 photos in place of one of the 4 x 6 photos. It's still the same 4 x 6 size, it's just made up of two photos instead of one.
• Variation #3 - On each of the strips I rounded one corner, the outer corner on the end where it meets the other strips. (Most of my corners ended up covered but I used bigger embellishments than I had originally intended.) Little subtle variations like this is a great way to change up the sketch without much time or effort.
• Variation #4 - I added a pre-cut scallop border from Bazzill Basics Paper across the top of the bottom strip. Keeping the same design but adding little details like that is a great way to add your own style to a sketch.
• Variation #5 - Sometimes journaling strips just don't work. You might have a journaling block that came with the papers you're using or you have a lot to say and need to save space. With most sketches if they have journaling strips a journaling block will work as a substitution and vise versa. The journaling space is a great area to change things up. Plus I don't think you should ever fit your journaling to a sketch. The story is such an important part of the page and sometimes the pictures just don't tell it all by themselves. I had a longer story to tell on this layout and didn't want to cut it down so I could use strips in the space provided. Instead I used a block, with rounded corners to match the corners on the strips, and I was able to fit a lot more journaling.

• Variation #6 - I used stars again, like suggested on the sketch, but I also added a few little details like hand stitching and word stickers. On the bottom right I made a glass with a twisty straw just like the straw in the pictures. (You all know how much I love to make my own embellishments!)

How to make the glass with the straw:
• First I cut two 2 x 3 pieces out of a transparency sheet.
• Then I cut three pieces out of a patterned paper that also measured 2 x 3
• On each of the patterned papers, I used a ruler (on one of the 2" edges) and made a mark 1/4" in with a pencil on both sides. Then I used the ruler and made a line from the marks to the top corner above. This will give you the slanted cut. The bottom of the patterned paper piece should be 1 1/2" and the top should be 2"
• Now you can use one of the patterned paper pieces as a guide to cut the same slant on the transparencies.
• On the transparency for the front I cut a downward curve. You could use a circle as a guide for this but I just hand cut it.
• On the transparency for the back I cut an upward curve.
• Next I cut a little off the top of each patterned paper piece so that they could be layered. The tallest one is 2 3/4", the medium one 2 1/2", and the smallest one 2 1/4".
• I cut waves across the top of each patterned paper piece and then I edged everything with ink, (even the transparencies.)
• To piece it all together I started with the medium patterned paper piece and adhered it to the tallest patterned paper piece with foam adhesive.
• Before I added the shortest patterned paper piece I made my twisty straw by bending Memory Thread to match the straw in the pictures and then adhered it to the back of the shortest patterned paper piece.
• The shortest patterned paper piece is then added on top of the medium piece with foam adhesive.
• I then added the transparency with the downward curve to the front.
• The last piece to add is the transparency on the back with the downward curve. Line up the top edge with the point on each side of the front transparency. The bottom of the back transparency won't go all the way to the bottom of the whole piece but that's okay since it's on the back.
Day two means it's your second chance at the giveaway! :)
57 comments:
I'm so thankful I found your blog recently! You have the best sketches & ideas :)
Leave it to you Allison to have a layout about a curly straw. This is so totally cool. I love the pictures in this one, he is one funny little man. The colors work great together, the stars, love the cup & straw you made for it. I never take pictures of my kids with straws because they blow bubbles in their milk/juice and make a mess. They haven't seen a straw in years because of this. Such a cool mom you are too, alwasys making sure your kids have fun no matter how simple the reason. Congratulations on having so many new people finding your blog, you deserve it. Thanks for another cool layout.
I love that memory thread. Do you have that at the store?
Too stinkin' cute! Love the glass and the straw and the stitching on your stars! Love the scallops and the pics are priceless! Home run Allison!
The stitching on the stars are great!!!
I like the rounded corners on the strips and I really like how one of the strips is the white with little dots...creates a cool tone on tone effect. I am also in love with the bendy straw you created for your paper piecing...I need to get me some of that memory thread!!
I love how your layouts are about the everyday stuff a lot. It's often those little things we forget! Love the embellishments and can't wait to try that thread!
Very cute- Love the embellishments:-)
Thanks for sharing your talent with us. I love the little tut you provided us, I will have to try that on a LO that has been floating around in my head - My family of 6 are big milk drinkers (like 1.5-2 gallons a day!)
Thanks again.
The colors in this layout are great! So stinkin' cute!
I love how you go into detail about everything like the supplies used, details how to make things, etc... I love the ideas about taking two smaller photos to fit a sketch. I need to use this sometime. The straw is really cute, love the pops of red.
Amy S from Texas
Thanks for the tip on using foam pop dots to make the pictures stand up a little. I had never thought about that, very creative tip!!
Pretty much a DITTO of everything that's been said. LOVE the MEMORY THREAD, LOVE the EVERYDAY MOMENTS ARE SCRAPWORTHY mentality, LOVE the SUBTLE CHANGES that create a WHOLE NEW LOOK...etc etc etc.
One thing that took some getting used to when I started using your SKETCH BOOKS, is that you SELDOM MAT your pics. Again, I LOVE that mixing some of your SKETCH LO's into my ALBUMS gives them a wonderful variety.
:)
WOW! I really like this one. I tend NOT to cut my photos, but I certainly can cut one in half inplace of the 3-2x2. Love it!!
Jody, IA
Oh, that glass embellishment is GREAT!!! I would have thought to make a glass with cardstock, but adding the transparency to represent the glass took it to a whole other level...you are such a creative genius!
And like so many others have posted, I am fascinated by that memory thread.
Your use of homemade embellishments is definitely an inspiration & helps me to think outside of the box! Very cute layout! I'm looking forward to using this sketch & challenging myself to use it more than once with different twists.
Thanks!
Stacie in Oklahoma
Aother beautiful LO!
Musings by Me, yes we have it at the store. It comes in quite a few colors. :)
Loving the Twisty Thread and how you use it to make your own embellishments.
This sketch is going to be sooo useful....I always take continuous action shots of my kids in sports etc.. and this lends itself so well to that type of photo op.
Thanks for the great ideas!!!
I love this. I love all the embellishments and the tips.
I like the stars, you could do a cute patriotic page too. Thanks
So cute! I love the little glass with it's own bendy straw! Where did you find the Memory Thread? I'm going to check Micheal's and Joann's but if it's not there, do you have a source? :)
Beautiful layout! Drew is such a cutie!!
Another daaarling layout. Love the everyday moments you capture.
Last month you and Dawn were talking about wallet sizes at walmart and how there are 4 of the same photo for about $.50. I also use walmart, but I use the collage prints. I chose the 4x6 size. I pick 2 photos and can even pick a background color if I want a thin mat for my pictures (change the border size to thick) I get 2 different pictures for the same price as a regular 4x6. The pictures are about 2.5 x 3.5 inches. Works great for a thrifty scrapper like me.
How will us mere mortals ever make our own pages now?
Adding hand stitching to my project queue! Thanks for the inspiration.
Super cute idea!
Thank you so much for taking the time to write all your variation ideas out. It's really helpful and soooo informative. Great sketch and great LO!
Great tip about inking the edges of the smaller photos or pop-dotting.
LouAnn
I love the cup and straw!! Another great use for that Memory Thread!!
Such a fun layout! That stitching is a neat addition!
I just found your blog, and I love your sketches! With the added variations, I can create multiple lo's without having to overthink them!
Great idea. I just ordered 2 of the volumes and I would really like a third, I hope I win!!
Okay, that cup and straw embellie is so dang cute!
Thank you for the step-by-step on how to make the cup and twisty straw. I love your hand-made embellishments!
What a really cool layout! I am learning so much from reading your blog. I love how you point out all the details of things you've done on the layout(s). Thank you for the instructions for the drinking glass. I love it and will have to try it sometime. :)
Cute, cute, cute! I love how you layer your embellishments and use different paper lines to make another great layout.
I like the idea of replacing the three small photos with one photo--how simple is that! I also like the hand stitching on the stars; I need to try to add some stitching to my layouts.
I love the way you placed the top pic and the pic on the far right ... makes it look like the straw is all one big long twitsty straw!!
Absolutely love love love sketch week!!! Thanks so very much for doing it!
LOVE your sketches and layouts!
I can't wait to try them myself!
Melisa
mwthornton@yahoo.com
thanks for the idea of the 2X6 photo to replace the 2x2's.....great idea!
thanks again!
awesome details. You keep out doing yourself.
Allison,
I love the cup and the straw. I love looking as just the most creative things you do. Some of them I would never have thought of!
Michelle Dorland
Love the embellishments, the detailed explanations, but most of all I love that you photograph and scrap the every day stuff that everyone can duplicate. I mean everybody can't go to Disney World but everybody's kids can play in the rocks, or eat a popsicle or play with a twisty straw! Just hope there all as cute as Drew when they do it!
Love your page and absolutely adore that cup with the bendy straw!
This layout is just too cute! I love the glass & straw you made yourself and how you've changed the bottom borders up in each of the three layouts to make each one unique! TFS!!
Moe, that glass would be perfect for a milk drinkin' layout!
Therese, those kind of pictures are perfect for layouts like these! :)
Erica, I'm not sure where a good place to find it is. If all else fails you can order it from us at the store and we can ship it to you. :)
CodyandTraci, thanks for the photo info! I'm going to have to look into that for sure. :)
Michelle, your comment gave me a good little giggle!
Thank you everyone! You are all the best blog readers a girl could ever ask for! :)
I love your use of embellishments on this page, I never would have though of incorporating stars and cherries. A really fun layout.
All the embellishments are so cute and the perfect touch. How long does it take you to do a layout when you make your own embellishments? I think it would take me all day to churn out great pages like yours.
Thanks for the directions on how to make the glass. Great page!
LOL the straw on the page totally blew me off!! the page is so cute!! your little man is handsome!
Your attention to detail amazes me. So many little touches that go together to give a wonderful overall appearance.
I love that straw, so neat!
I love how you have made another fun layout with the same sketch Allison :)
I was introduced to your sketches & blog through Fiskateers and I'm so glad. I'm loving how you can change the look using the same sketch AND how you use multiple photos!!! It is the fun everyday things that make life special but it is usually quite hard to make layouts of them without having to choose just 1 or 2 shots, so thankyou for making scrapping easier & more fun too :o)
Such a happy place to be this week - so glad I found you, your style is so vibrant!
OK...I think the glass and straw just might be the cutest embellishment I've seen in a long time - and you MADE it! - wow!
i think i have a new found obsession!!
Post a Comment