Friday, January 29, 2010

And the winner is...

Of course I'm not going to tell you the winner at the beginning of the post!

I thought it might be kind of cool to see all the layouts together. I love that they all look similar but still very different at the same time.

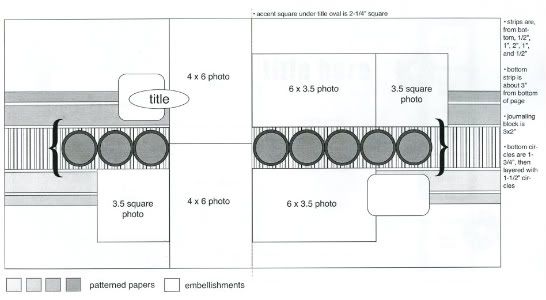
Sketch from Sketches for Scrapbooking, Volume 5


I had so much fun this week! Because of popular demand this will become a regular feature on my blog. Every month I'll have a week that focuses on getting the most out of sketches. I'm really excited about it and hope you are too. 

Also, if you have any of our Sketches for Scrapbooking books I would love to see your layouts and variations on the sketches. Feel free anytime to post a link to your page so I can check it out. It would be awesome to see what other people are doing with our sketch books.

On to the winner! Congrats to...

Amy said...
I found your website through a friend and now I'm addicted! I have your books on my wish list and hope to collect them all VERY soon.


A Sketches for Scrapbooking sketch book is all yours! Just email me at alidavis1919@hotmail.com and let me know your address and which volume of the book you want.

Now before everyone takes off and leaves, I've got a surprise. First of all, I want to say a big ThAnK yOu to each and everyone that commented. I've got the best blog readers ever! I could tell from the comments that you guys were actually reading my posts and I was just blown away with all the awesome things you all said. 

So...I'm giving away two more books!

Robin P. said...
I love all the different ideas this is giving me!! 


and

Jen**SugaredSongbird** said...
I totally agree with Amy in KC about your use of multiple pattersn- it so works! Thank you for sharing all the ins and outs of using sketches!


You are both getting a copy of Sketches for Scrapbooking as well. Just email me with your address and volume choice.

I hope everyone one has a great weekend! :)

Thursday, January 28, 2010

1 sketch, 4 layouts - Part 4

The last one of this series. I'm kind of sad, this has been fun!

The sketch that all of my layouts have been based off of from Sketches for Scrapbooking, Volume 5.


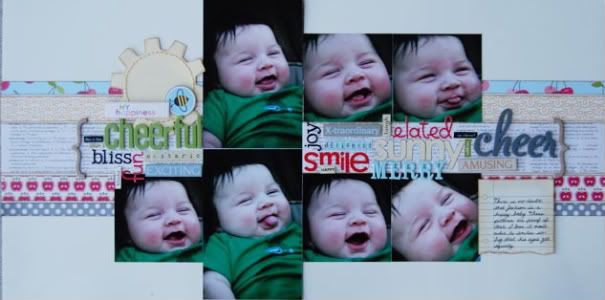
Layout #4 - "My Happiness"

Patterned paper, bee sticker, title sticker - October Afternoon, alphabet and word stickers - Doodlebug Designs, American Crafts, SEI, Cloud 9 Designs, 7Gypsies, My Little Shoebox, journaling card - Jenni Bowlin

• Variation #1 - Just like layouts 1, 2, and 3, the biggest change from the original sketch is that middle line of elements. Making a collage of words like that can be a little challenging and intimidating but once you get a few down it gets easier and they all start to go together like puzzle pieces. 

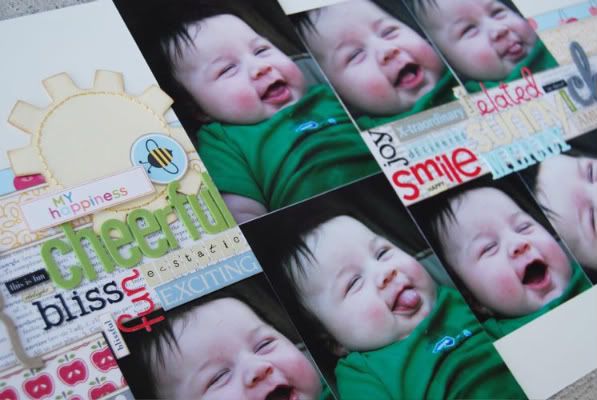
I pulled out several different colors, sizes, and textures of alphabets. I think it's easiest to start at the edge of something, in my case, I started with cheerful (to the left of the 4" x 6") and then filled in words around it. The smaller word stickers were my "filler" pieces. If I had a small space that I couldn't fit alphabets stickers into, I used the word stickers instead. You can get a closer look at in the picture below.


• Variation #2 - This time I actually did use an element behind the title. It's a little larger than the square on the suggested sketch but works nicely in that space. Another thing I might add, the sun is actually supposed to be a gear wheel mini-album page. I tend to use chipboard mini-albums on my pages more than actually making a mini-album out of them. The work great for extra large embellishments.

• Variation #3 - On the last layout I didn't use a stripe for that middle strip because I didn't want the colorful Christmas trees to get lost in it. The same goes for this layout. Using a strip for that middle piece would have made those words hard to read. The newspaper print patterned paper worked great because the the words on it are small and all one color.

• Variation #4 - I really changed up the photos this time. The two 4" x 6" photos are the same as the sketch but the rest are completely different sizes than the ones suggested. With these photos I had a lot of empty space around Jackson's head so I thought they would all look better cropped down to just his face. Cutting them all down to 3 1/2" squares kept the focus on his cute smiles and not the empty space. I could have even cropped the two 4" x 6" photos down to 3 1/2" squares and that would have worked well too but the major drool trail down Jackson shirt always makes me laugh.

• Variation #5 - The journaling piece on this page is from a pad of cute little notebook and ledger type journaling pages. It's a little larger than the suggested size for the block but I don't ever worry too much about that. I never try to squeeze my journaling into a smaller space. I always see the journaling placement on a sketch as just that, placement. I hardly ever worry about the size and instead put my focus on the story I want to tell. If it ends up taking up a little more space than the sketch recommends, I'm okay with that. To me the layout's main focus needs to be the pictures and the story. And I'll always make room for that!

Last day for the giveaway! Be sure to check back tomorrow to see who the winner is! :)

Wednesday, January 27, 2010

1 sketch, 4 layouts - Part 3

Here we go with layout #3. :)

The original sketch that I'm basing my layouts off of from Sketches for Scrapbooking, Volume 5.


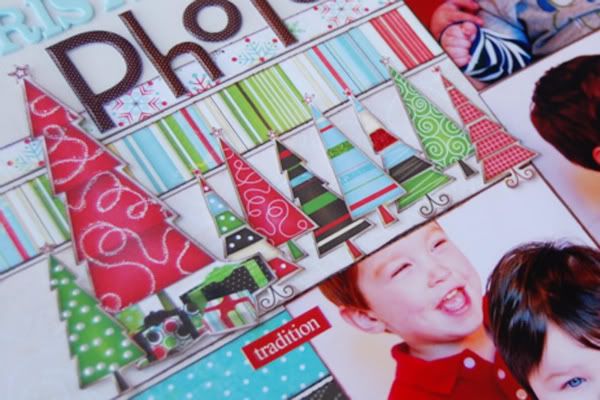
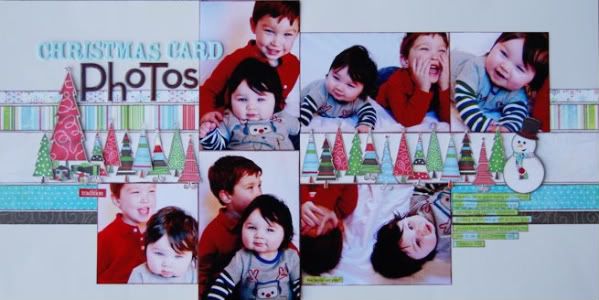
Layout #3 - "Christmas Card Photos"

Patterned papers (including the Christmas trees, snowman, and journaling strips) - BoBunny, alphabets - American Crafts and Making Memories 

Just like layout #2, this one has a several variations.

• Variation #1 - Of course, the biggest change is, again, the middle section of embellishments. This time I cut all those little trees from a piece of patterned paper. To add a finishing touch I added some Stickles to a few. I also have them all adhered to the page at different heights by using foam adhesive. I tend to get a little pop dot crazy and sometimes probably go a little overboard with them. I personally think it's a great and easy way to make certain elements stand out.


• Variation #2 - The larger tree sitting with all the smaller ones is the element that I used instead of the square on the original sketch. Just like the last layout, it's not in the exact spot as the square on the sketch. After I added the title, the taller tree was a perfect fit and it's still close enough to the general area of the square that it serves it's purpose, to add balance to the layout.

• Variation #3 - One thing we include on our sketches in Sketches for Scrapbooking is a little key/guide to help you with picking out the right papers. On the sketch for this layout the middle strip is suggested as a stripe. I decided to use a solid color instead since the multiple colors of the Christmas trees would have most likely gotten lost in the colorful stripe, especially since some of the trees themselves are striped.

• Variation #4 - You might not notice it right away but I went with different photo sizes than on the sketch. I almost always work with 4" x 6" photos. Most of the time if I have cropped photos they are cropped from a 4" x 6" print. With this set of pictures there really wasn't a lot of room for cropping. Since the photo measurements on the sketch are only 1/2" difference I decided to leave them as 4" x 6" for the larger ones and on the photos that are supposed to be a 3 1/2" square, I instead cropped them to a 4" square.

• Variation #5 - Yesterday I had mentioned using journaling strips and on today's layout I did. I really like the look of journaling strips because you can use them in so many ways. You can have them all the same length or for fun, all different lengths. You can add them to the page in a straight formation or you can "wrap" them around something on the layout. I tend to use them a lot!

A new day means a clean slate for the giveaway entries! :)

Tuesday, January 26, 2010

1 sketch, 4 layouts - Part 2

My starting point, the sketch I'm using from Sketches for Scrapbooking, Volume 5.


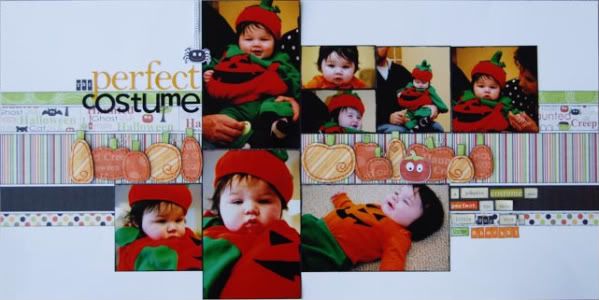
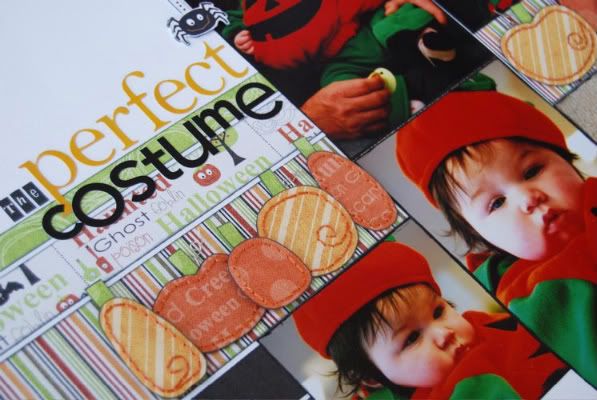
Layout #2 - "The Perfect Costume"

Patterned papers (including the pumpkins), cardstock spider - My Mind's Eye, alphabets - Doodlebug Designs and My Little Shoebox, word stickers - Making Memories and Scenic Route

On this layout I did a few variations.


• Variation #1 - Probably the most obvious change is the center line of embellishments. This layout really shows one of my favorite things to do on my pages. I love making my own little handmade touches. I really want to say that it's me putting my heart into my layouts so that my boys will appreciate it down the road but honestly, they're boys. I'm not sure if they are going to be too excited about my scrapbooks or my handmade touches. I think the real reason why I love adding handmade touches is simple, when it comes down to it I just like to make stuff.

I made each of those pumpkins going across the middle strip from scratch (except for the smiling one. That one is a die cut.) To do that I hand drew each one and while doing that I didn't worry about them being perfect. I wanted them to resemble real pumpkins and I've yet to see many pumpkins at the patch that were perfectly round. After I cut them out I added hand stitching and stems. On some of them I added craft wire with loops by the stems.

You can get a closer look at them in this picture.


• Variation #2 - You also might notice in the picture above, the cute little spider above the title. Again, I replaced that square behind the title with something a little different. This time the element is quite a bit smaller than the square on the sketch but like I explained in the last post, it's all about taking the sketch as a suggestion. As long as that element is in the general area, it's going to work.

• Variation #3 - I added some smaller photos in place of one of the 6" x 3.5" pictures. Together the three photos are still in the same 6" x 3.5" block. This is a great solution for those times when you have more photos than the sketch calls for. I was able to add more photos without altering the photo placement on the sketch.

• Variation #4 - Instead of using the journaling block, I decided to use individual word stickers for my journaling. Doing this or journaling strips is a super easy way of adding a different look to the layout.

The giveaway is still going on today. Everyone gets a second chance at winning a copy of Sketches for Scrapbooking! (Even those that posted yesterday.)

Monday, January 25, 2010

1 sketch, 4 layouts - Part 1

I strongly believe that sketches are a great tool for any scrapbooker. Beginner or advanced, it doesn't matter. What it all boils down to is that sketches save us time and take out the headache of trying to figure out where to put all the elements. A beginner may follow the sketch down to every single measurement and placement while an advanced scrapbooker might use it as more of a starting point and then add their own touches here and there. Either way, sketches are a tool that everyone can benefit from.

What I'm showing you over the course of this week is how to take one sketch and use it multiple times. By making simple variations you can use the same sketch over and over and each layout will look completely different.

This is the sketch I'll be using as my starting point for all four layouts from Sketches for Scrapbooking, Volume 5.


On this sketch one of the elements that really stands out, aside from the pictures, is the line of embellishments (circles) across the middle. This is where a lot of my variations over the four layouts takes place. This line of elements can easily be altered to fit any theme and would work with virtually any pictures.

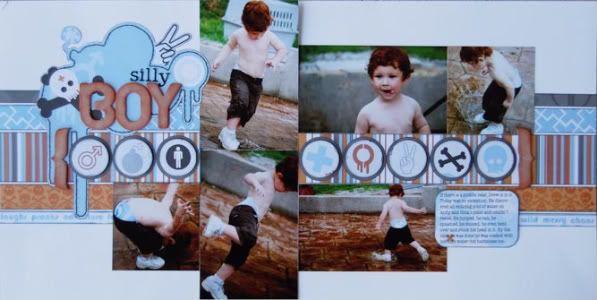
Layout #1 - Direct Copy (almost)
"Silly Boy"

Patterned papers (including the cut out design behind the title, the circles, and the journaling block) - KaiserCraft, alphabets - Doodlebug Designs and BasicGrey

Okay, I should probably explain that with a little more detail than just "almost." I always look at a sketch as a suggestion. If there is a 1/2" strip of paper, I might use a scallop strip or a torn strip. If there is a circle embellishment, I might use a star or a flower.

On this particular sketch there is a square underneath the title. I ended up using a large design cut from a piece of patterned paper.


Sure it's a lot bigger than the suggested square but, in my opinion, it doesn't matter. All that matters is that the sketch suggests using an element in that general area of the page to help balance the overall look of layout.

Since this week is all about using sketches I thought it would be fun to do a giveaway! I'll be posting everyday, Monday-Thursday, with a layout based off the same sketch. All week you'll have a chance to leave a comment and on Friday I'll post the winner who gets a copy of Sketches for Scrapbooking (Volume choice is all yours.) You can leave more than one comment through the week to be eligible but not on the same day. :)

Be sure to check back tomorrow for layout #2!

Thursday, January 21, 2010

Going down like dominos


This Scrap-a-Palooza was a crazy one. Crazy because we had the most attendance ever (240) and then crazy because a stomach bug crashed and burned on our usual plans.

For those of you that don't know, the four of us at Scrapbook Generation all play a vital roll in 'Palooza. Mom takes care of all the free classes, helps with customers, and assists with whatever little things comes up. Karin runs the store until 5 p.m. and then heads over to help. Stacey runs the register, which runs all day, and is our computer nerd that fixes any technical issues we might run into. I spend the day running between my big screen demos and classes and then help with customers inbetween. We all spend the day going, going, going.

The Friday before is a crucial day in 'Palooza land. That is the day that we set up our store at Remingtons and we have a very limited time to do it in. For those of you that have been, you've seen how big our on site store is. The way our system goes is that Mom and Stacey do set up while I stay home and get my three demos ready and package my class kits. On Friday, I was just settling down to work on my demos when I get a text, "Can you come help Mom, I'm sick!" Oh no! Stacey had come down with the same "flu from hell" that my family had all had the week before. I'm not going to lie, the worry was settling in. As I explained earlier we each have such a vital roll that someone being sick just isn't an option. But having had the same flu only a week before I knew that this wasn't good.

I get to Remington's as fast as I can to help Mom set up thinking that I could help for a few hours and then get back to my part of the big day. Boy was I wrong. When we left at 4 p.m. I was starting to worry a little about being able to get my demos and kits done. I'm no stranger to staying up late, it's the night owl in me, but I knew when I got home that I would be pulling an all-nighter. Wrong, I got a 45 minute nap at about 6 a.m. I seriously wanted to cry when my alarm when off.

After getting the boys ready and heading out the door, my phone rings. I knew the instant that I saw the caller id that Mom was sick. I don't really remember the conversation because the panic was setting in. I remember bits like, "I won't be there." and "Stacey is going home, she still doesn't feel good." Karin runs the store while 'Palooza is going on so that left me. Me to be in charge of 240 people. Me to teach my classes. Me to do my big screen demos. Me to do the free classes. Me. Me. Me. I had a mini-panic attack wondering how in the world this was all going to go smoothly.

Long story short, things actually worked out great. Stacey ended up feeling better and stuck around. Stacey and Mom's husbands were called in to run the registers (and the ladies loved them!). I did my usually running around like a mad woman doing demos and classes. Karin came over after the store closed and helped out. I was amazed at how many of our customers that offered to help. All went as great as every other 'Palooza as far as I'm concerned. I'm thinking every 'Palooza after this is going to feel easy!

Monday, January 18, 2010

My camera has been stolen...


Okay, not really stolen. More like, I left it in the back seat of my husband's car and he left for work before I remembered to get it out. Totally his fault, right? Just for my sake we'll say yes. Well that and it really doesn't matter since he doesn't read my blog. Basically I can point the finger all I want and he'll never know. Since we're going that route I'll also point out that it's totally his fault when I forget to put the stroller back in the car and I find myself stuck at the mall carrying a 1 1/2-year-old, and a chubby 1 1/2-year-old at that, for two hours. 

Anyway, I had this great blog post all ready about the crazy Scrap-a-palooza outcome and my recent TV appearance but because it drives me crazy to have a post without pictures to go with it, I've decided to wait. 

So you can blame my husband, okay, and maybe me a little for this completely pointless and boring post. Feel free to scold him, (not me though!) Maybe then he'll learn to check the car for my belongings before he takes off. 

Men. They are so difficult sometimes.  

Wednesday, January 13, 2010

'Palooza time

225 scrapbookers, a huge store with oodles of new goodies, and a chocolate fountain can only mean one thing, it's Scrap-a-Palooza time!

Right now I'm packaging my class kits and am up to my ears in the fun products that I'll be demonstrating on the big screen. The three classes that I'm teaching are filling fast, faster than any of the other 'Paloozas. If you're going and thinking about taking a class I would suggest signing up now. Usually I get the most sign ups the day of, but at this rate they will be near full by then! You can see all three class below.

"Baby, it's Cold Outside"


"I Love Everything About You"


"What's Cookin'"


Hope to see you there! And if you didn't get signed up for this one we've got plenty more this year. 

Scrap-a-Palooza, Remington's Entertainment Complex (Springfield, MO)
• June 26, 2010
• September 25, 2010

Scrap-Mania, Windermere Conference Center (near Camdenton, MO)
• April 24, 2010
• October 9, 2010

You can get more information at Scrapbook Generation. :)

Monday, January 11, 2010

Cheeeeeese!

Last week was a rough one in the Davis house. We got hit with a nasty stomach bug that showed no mercy. Don't worry, I'll spare you the details. Just take my word for it, yuck!

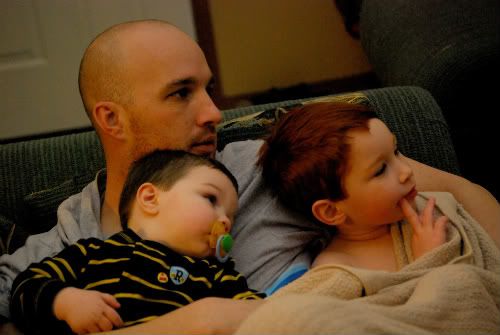
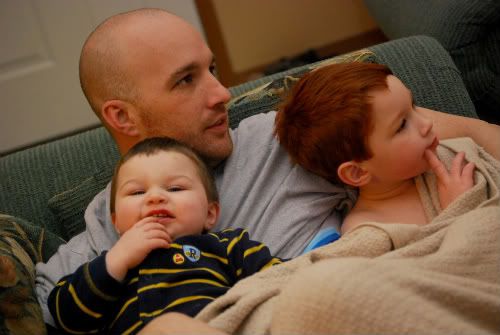
On day #3 of the flu from hell I happened to catch this super sweet moment of the boys while we were watching Up.


The second the camera clicked and the flash went off Jackson looked at me and started saying "Cheeeeeese!" Well of course that prompted me to take another while he continued, quite proudly, to say "Cheeeese!".


It didn't take long for the other two to join in and the loud, yet harmonious "Cheeeeeese!" that erupted from our living room couch most likely could be heard across the street.


DVD Update:
Don't worry, we are still working on the DVD. With Scrap-a-palooza this weekend we had to take a minor break and focus on preparing for our mega crop. We had high hopes of finishing it before then but we quickly learned that it is taking more time that we had originally thought. We also found out that we have to re-shoot one of the segments but we plan to do that as soon as this weekend passes. Believe me, with each layout that is finished I get more and more excited! :)

Tuesday, January 5, 2010

Sketches for Scrapbooking, Volume 5 is here!


It's January and that means it's sketch book time! (We publish a new Sketches for Scrapbooking every six months.)

Another volume and another 30 new sketches to assist you in your scrapbooking. Each sketch contains photo sizes, paper measurements, and a key at the bottom to help you pick out your papers...stripe, large pattern, small pattern, accent cardstock, etc.

You can order the book here. If you've never used our sketch books before you can also go here, and try one out. Just click on one of the three sketches on the bottom right of the page for a more detailed view or you can even print it out.

We've been so excited over the popularity of these books. If you haven't already I would definitely go try one out. I love how fast my pages go together when I use them!

What a difference a year makes.

I can't believe that in one year Drew has gone from this shaggy haired, cutie...


To this tie totin' little dude.


And Jackson went from all cheeks and no neck...


To, well...actually still a lot of cheeks. At least we can (kind of) see his neck now. 


Every New Year's, every birthday, almost every day I catch myself thinking, "Where in the world did the last year go?" These pictures of the boys prove to me how much things can change in such a short amount of time. How one little year can make a huge difference. 

I hope everyone had a wonderful 2009 and cheers to an even better year in 2010. :)

I wish I had a fabulous excuse for being MIA in blog land. You know, something like vacationing in Italy or winning a couple million on a lottery ticket. Sadly, I have no grand excuse or glamorous stories. Just me trying to find a balance between work and my home life and my blog usually ends up paying the price and getting cut out of the mix. But being the super nerd that I am I've actually started a blog schedule to hopefully save me some time and allow me to post more often.